Category Archives: Uncategorized

You Are Missing Out…

Newsletter header
…if you haven't subscribed yet to my The Soggy Stamper Newsletter. I am excited about the projects with pictures and complete instructions that are in the May issue! It  will be coming out next Tuesday so don't put off subscribing. Do it now! The signup box is on the sidebar to the right.

Blessings,
Sue
sue@soggystamper.com

New Downloads for My Digital Studio!

Stampin' Up! releases new downloads for us to purchase every Tuesday. This keeps our digital stamp rooms up to date with fresh images and accessories on a regular basis. Click here to see the new Stampin" Up! April 26 downloads. Jot down item numbers and then visit my online store to order these new releases. The wonderful thing about My Digital Studio and digital stamps and accessories is that there is no shipping and waiting for your order to arrive. As soon as you complete the transaction, you can download your purchase.

Happy Creating One Click at a Time,

Sue
sue@soggystamper.com

Oh No! Time is Running Out!

You have only three more days until April is over! This means that Stampin' Up!'s Spring is Blossoming Promotion and the Occasions mini catalog sales period are also over. You must place your orders for the items in the Occasions mini catalog by the evening of April 30 as most of the stamps and designer papers will not be available any longer. While you are placing your order, take advantage of the Spring is Blossoming promotion. Placing a $20 order of products from the mini catalog and/or the Idea Book and Catalog gives you the ability to order the Four Frames stamp set and the Paisley Petals Designer Series Paper. These two items are a sneak peak from the new 2011-2012 Idea Book and Catalog. Click here to see  my favorite card I created with this stamp set and the designer papers. After April 30, you won't be able to order them until the release of the new catalog on July 1. If you have been debating about a certain stamp set or accessory, don't put off buying it any longer. You know you will be sorry if you don't get it while it is available. Click here to start shopping!

Four Frames Stamp Set                                      Paisley Petals Designer Series Paper (122367)
(123440, wood) (123442, clear)

SIB_Promotion_FourFrames_LP_TH                                         SIB_Promotion_PaisleyPetalsDSP_LP_TH

Thanks for stopping by to visit today. Do come back again soon!

Happy Stamping,
Sue
sue@soggystamper.com

Paisley Petals Designer Paper – Stamping 411 challenge


4-23-11 sketch Paisley Petals_edited-1


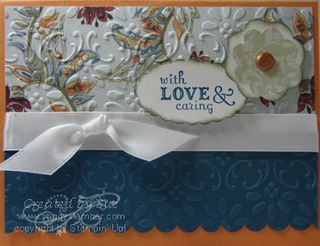
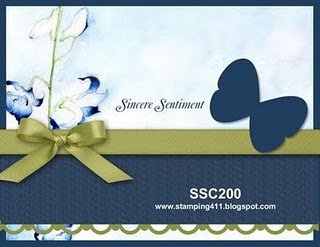
I love playing along with the operators over on Stamping 411! Last weekend's sketch was fairly simple. When I saw the scallop edges, I thought of a scalloped edge of a quilt. I love the quilted look of cardstock and designer papers that have been dry embossed with an embossing folder. So that is the theme of my version of the sketch. I used my favorite Paisley Petals Designer Series Paper, the new Blossom Bouquet Triple Layer punch, the Finial Press embossing folder, and Thanks for Caring stamp set. I used a Peach Parfait Glimmer Brad in the center of the flower. I hope you like this card. My husband said it was gorgeous and he is hard to please…LOL!

Stamp Set: Thanks for Caring (121901, wood) (121961, clear)

Paper: Not Quite Navy card stock (101722),
        Peach Parfait card stock (119794)
        Paisley Petals Designer Series Paper (122367)

Ink: Old Olive (102277) and Not Quite Navy (103008) Classic ink pads

Other: Blossom Bouquet Triple Layer Punch (122464)
        Scallop Oval Extra-Large Punch (119856)
        Scallop Edge Border Punch (119882)
        Whisper White 5/8" satin ribbon (114616)
        Peach Parfait Glimmer Brad (121005)

Take time to browse my blog and enjoy a virtual cup of java or tea with me. Cup of coffee-001_edited-1 Then leave a comment so I know you have been here to visit.

Blessings,
Sue
sue@soggystamper.com   


My Digital Studio – Tuesday Tip

As you are creating a project with My Digital Studio, have you ever gotten frustrated because you couldn't get the various items to line up evenly? I sure did! My mouse movements were just not quite fine enough to get the needed slight moves of an object on the page. Then I discovered this little trick.

Select one of the objects you want to align. Then hold down your Shift key and select the other objects you want. Next go to the tool bar at the top of the screen and choose the 'align objects' icon. Then you will get a pull-down menu allowing you many options on how you want to align them. This is sooooo much easier! I hope this little tip will help you as much as it has helped me.

Happy creating one click of a mouse at a time,
Sue
sue@soggystamper.com

My Digital Studio Monday – Easter Blossoms Card

Easter Blossoms My Digital Studio Card

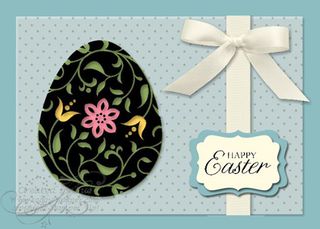
Welcome to My Digital Studio Monday. I love using My Digital Studio to create quick cards without having to haul out all my supplies. Last week I was in a rush to get little Easter treats in the mail for our grandkids and great-grandkids. I realized at the last minute that I should also send a card to their parents so I printed out this card I shared last week. I trimmed it down and layered it onto Wild Wasabi card stock and then onto a Whisper White card base. I had six cards completed in less than an hour!!! Gotta love My Digital Studio!

Now on to today's card which I created for not only this blog but also for the Utah Divas International blog.  I used three Wide Oval punches resized and rotated to fit the egg and colored-filled them with Wild Wasabi color. Then I used two Fun Flowers Shapes #3 punches ovelapped and resized to color the center flower with Regal Rose color. I used a small circle punch filled with Daffodil Delight for the two smaller flowers. I was surprised how adding the drop shadow to the black layer of the egg gives depth throughout the whole egg. I used Cottage Wall Designer Series Paper #8 at 50% opacity to fill a square punch stretched into a rectangle for the DSP layer.

Stamp Brush Set: Easter Blossoms – egg (124436)

Designer Series Paper: Cottage Wall #8 (124560)

Other: Square and circle punch from Punch Shapes (118853)
        Decorative Label punch (123951)
        Fun Flowes Shapes #3 punch  (124453)
        Very Vanilla Satin Ribbon and Bow (121063)

I hope you all had a wonderful Easter. This was the first year of no rain on Easter after several rainy years so we were blessed with a wonderful Easter Sunrise service. 'Course, the sun rises here at about 5:30 am now but we held the service at 7:00 am anyway. Not many people would get up at 5:30 even on Easter.

Thanks for stopping by to visit. Please leave your calling card by leaving a comment. If you like this card, I'd love to have you share it with your friends. If you haven't signed up for my mailing list yet, please take time to do that as well. The sign-up box is on the right.

Happy Stamping,
Sue Erickson
sue@soggystamper.com


My Digital Studio Monday

Friends 24/7 simple card-001_edited-1        7  4-11-11-001_edited-1


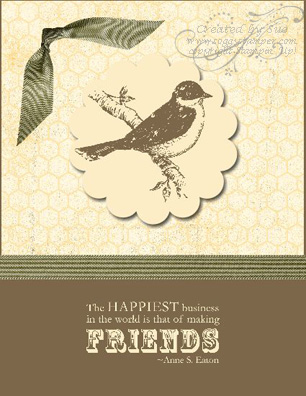
I am on the design team for Utah Divas International My Digital Studio Monday and we are supposed to be designing digital cards with My Digital Studio with the beginner in mind. Ooops! I got so involved with creating my card, adding a layer here and a spot of color there, that I forgot it was supposed to be for a beginner. So I created the same card using just very basic techniques.

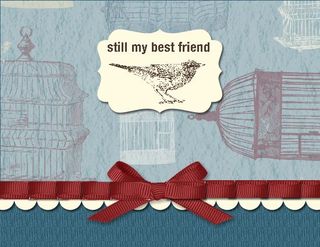
For the basic card I started with a base color of Soft Suede. I stretched the square punch to cover about 2/3 of the card and filled it with one of the patterns from Botanical Gazette Designer Series Paper. I added a strip of Always Artichoke Seam Binding over the bottom of the designer paper. I filled the scallop circle punch using the color picker and picking one of the colors in the designer paper. I added a drop shadow to the punch so it stood out. I stamped the bird from the Friends 24/7 Stamp Brush Set onto the scallop circle and colored it with Soft Suede. Next, I stamped the verse from Friends 24/7 on the soft Suede bottom of the card and used the color picker to match the print with the scallop circle. Finally I added an Always Artichoke seam binding knot.

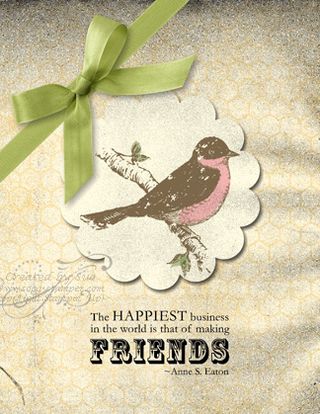
In the stepped up card, I skipped the Soft Suede base and applied the Botanical Gazette Designer Series Paper directly on the base. I filled the scallop circle with Very Vanilla and again stamped the bird with Soft Suede. I used the oval punch to add Blushing Bride to the bird's breast and neck. After I got the ovals in place I moved them backward so the soft suede stamp was in front. Again I added a drop shadow to the scallop circle. I used a leaf punch from Blossom Petals Punch filled with Wild Wasabi to color in the leaves. The next layer I added was Vintage Overlays Texture 8 Stamp Brush to add some antiquing. When I stamped the verse from Friends 24/7, it was difficult to read on top of the designer paper so I placed an oval punch filled with color picked from the background paper behind the verse. I reduced the opacity until the edges of the oval pretty much blended into the background. Finally I placed Pear Pizzazz Seam Binding diagonally across the corner and added a bow.

The simple card was very quick to design…maybe because I did the stepped up one first and didn't need to experiment with design. I like both cards but the stepped up one is my favorite. Which card do you like best? Leave me a comment. The design process was so much fun and so satisfying. To purchase the files I used, just click on the item numbers and the link will take you to my online store. If you don't own My Digital Studio yet and are dying to try your hand at digital creating, just click on the link.

Stamp Brush Set: Friends 24/7 (118829)
           Vintage Overlays (121061)

Papers: Botanical Gazette Pattern 6 (122169)

Other: Square, scallop oval, and plain oval punches (part of Punch Shapes 118853)
           Blossom Petals Punch – leaf 2 (124018)
           Pear Pizzazz Seam Binding from Seam Binding II Ribbon Pack (124020)

Thanks for coming to visit today. Here is your virtual cup of coffee or tea   Cup of coffee-001_edited-1 to enjoy while you browse. Do come back again soon.

Happy Stamping,
Sue Erickson
sue@soggystamper.com


My Digital Studio Ruffled Ribbon Card

  Ruffled ribbon card-001 I wanted to try my hand at creating a pleated ribbon on my card using My Digital Studio. I learned the technique from a video Cindy Schuster shared on www.mydigitalstudio.net. I love the Botanical Gazette Designer Series Paper so I combined it with the Nature Stamp Brush Set. The colors in this particular design are Cherry Cobbler, Baja Breeze, and Very Vanilla so I used Cherry Cobbler grosgrain ribbon. The bird and greeting are Early Espresso. I tried to make the Decorative Label punch and the bird be reminescent of one of the stamps in the new Four Frames stamp set. I love that set and hope it will be available digitally soon! I hope you like my card. Please leave a comment…I love getting comments! :o)

Stamp Brush Sets: Nature (123603), Chat Room Friend (124543)

Paper: Botanical Gazette Designer Series Paper – pattern 5 (122169)
        Textured Card Stock – Not Quite Navy

Accessories: Decorative Label Punch (123951)
        Scallop Edge Punch (part of Punch Shapes 118853)
        Cherry Cobbler Grosgrain Ribbon

Thanks for stopping by to visit today. I hope you took time to enjoy a virtual cup of tea or coffee with me and browse a bit. Cup of coffee-001_edited-1


Happy Stamping,
Sue Erickson
sue@soggystamper.com

Let Sleeping Dogs Lie

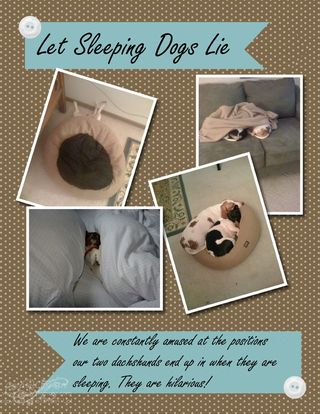
Let Sleeping Dogs Lie-001_edited-1 Our two mini-dachshunds are a never-ending source of entertainment and laughs for us. Here is a scrapbook page I created with My Digital Studio of them in various sleeping positions. The pictures are hilarious. One night I was working at my computer and kept hearing this scratching noise. I finally investigated. Little One was sleeping on her back with her legs up against the wall and her doughnut bed on top of her. The pups like to sleep wrapped up tightly in a blanket we have on our couch, n some instances….almost all wrapped up. I hope you enjoy this scrapbook page.

Background Paper: The Write Stuff II – Soft Suede Designer Series Paper (120881)

Punches: Square punch stretched to a rectangle and filled with Baja Breeze color
        Square punch turned 1/4 turn , placed at end of rectangle and filled with the background paper (from Punch Shapes 118853)

Accessories: Button Latte – Whisper White Button (118867)

Font: Freestyle Script in 38 and 68 size

If you would like to order any of the elements of this page, just click on the item number and the link will take you to my online store. I'm glad you came to visit today. Do come back again soon!

Happy crafting with a click of a mouse,
Sue Erickson
sue@soggystamper.com


It’s Monday – It’s My Digital Studio Monday!

  MDS Monday 4-3-11-001_edited-1
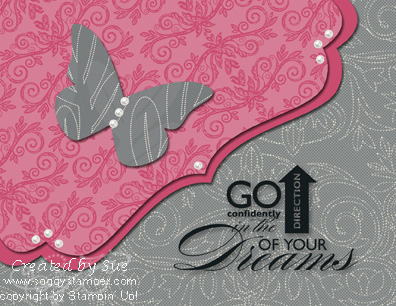
Good Monday morning! Here is a card to encourage you as you start the day and the week. When I started out creating this card with My Digital Studio, I had no idea I would be creating a pink and gray card. The creation took on a life of itself and this is what evolved. I like the sophistication of the pink and gray together. My word today for you all is "Go confidantly in the direction of your dreams!" The diagonal shape across the card comes from enlarging the Decorative Label Punch and dragging it off the workspace so just one edge of the punch is in the card. I did this twice with two different sizes of the punch and color-picked the rosy/red color from the Strength and Hope Designer Series Paper pattern #3. To purchase any of the elements in this card, just click on the item number and the link will take you to my online store.

Stamp Brush Set: Word Play – dreams whole (124432)

Background paper: Lap of Luxury Designer Series Paper – pattern 10
                        (123992)
Punches: Decorative Label Punch (123951) filled with Strength and Hope
                        Designer Series Paper Pattern 3 (124475)

        Butterfly shape 2 (124412) filled with Lap of Luxury DSP – pattern
                        3 with punch moved to bottom left hand corner
Embellishments: Basic Pearls and Rhinestones – medium sized pearls (124330)

I hope you like this card. If you do, would you please share it with others and also leave a comment for me? I'd also be really, really excited if you would visit my FaceBook page and 'like' me.

Happy mouse clicks to you,
Sue Erickson
sue@soggystamper.com

My Digital Studio Monday

  MDS Monday 4-3-11-001_edited-1
Good Monday morning! Here is a card to encourage you as you start the day and the week. When I started out creating this card with My Digital Studio, I had no idea I would be creating a pink and gray card. The creation took on a life of itself and this is what evolved. I like the sophistication of the pink and gray together. My word today for you all is "Go confidantly in the direction of your dreams!" The diagonal shape across the card comes from enlarging the Decorative Label Punch and dragging it off the workspace so just one edge of the punch is in the card. I did this twice with two different sizes of the punch and color-picked the rosy/red color from the Strength and Hope Designer Series Paper pattern #3. To purchase any of the elements in this card, just click on the item number and the link will take you to my online store.

Stamp Brush Set: Word Play – dreams whole (124432)

Background paper: Lap of Luxury Designer Series Paper – pattern 10
                        (123992)
Punches: Decorative Label Punch (123951) filled with Strength and Hope
                        Designer Series Paper Pattern 3 (124475)

        Butterfly shape 2 (124412) filled with Lap of Luxury DSP – pattern
                        3 with punch moved to bottom left hand corner
Embellishments: Basic Pearls and Rhinestones – medium sized pearls (124330)

I hope you like this card. If you do, would you please share it with others and also leave a comment for me? I'd also be really, really excited if you would visit my FaceBook page and 'like' me.

Happy mouse clicks to you,
Sue Erickson
sue@soggystamper.com

My Digital Studio Iris

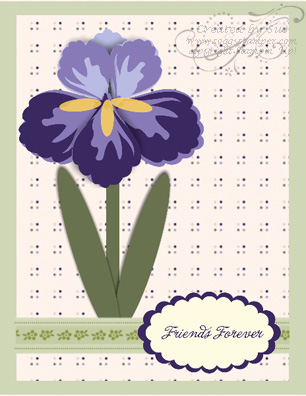
Iris MDS cardI love irises and challenged myself to create one using the digital version of Build a Blossom. I used the color picker to pick the color from the Ice Cream Parlor Strip 2 for the base of the card. The next layer is the square punch stretched and filled with Lap of Luxury Designer Series Paper Pattern 1. The upper petals of the iris are colored with Almost Amethyst and Lovely Lilac while the lower petals are Lovely Lilac and Concord Grape. The fluffy yellow part of an iris was created by shrinking the oval punch and filling it in with Daffodil Delight. I created the stem by stretching and narrowing the square punch and filling it with Always Artichoke. The leaves were created from oval punches and again filled with Always Artichoke. I added the Ice Cream Parlor Strip 2 and placed Ice Cream Parlor Strip 7 over it.

I love the way this card turned out. What do you think? Does it look like an iris? Leave me a comment and let me know.

Stamp Set Brushes: Build a Blossom (124019), Chat Room Friend (124543)

Paper: Lap of Luxury Designer Series Paper Pattern 1 (123992)

Punches: Scallop Oval, oval, and square from Punch Shapes (118853)

Accessories: Ice Cream Parlor Strip 2 and 7 from So Much to Sale-a-Brate Digital Content CD (123681) Free with $50 purchase! Offer ends March 31!

Thanks for coming by to visit today. Here is a virtual cup of coffee or tea for you to enjoy while you browse my site. Cup of coffee-001_edited-1


Happy stamping,
Sue Erickson
sue@soggystamper.com

Check These New My Digital Studio Downloads Out!

Check these new digital downloads out! I love the fact that Stampin' Up! keeps My Digital Studio fresh and current with the new catalogs as they come out. Click here to view these files and then visit my online store to purchase the ones you know you have to have.

Thanks for coming by to visit. Do come back again soon.

Happy digi-stamping,
Sue Erickson
sue@soggystamper.com


My Digital Studio Iris card

Iris MDS card

I love irises and challenged myself to create one using the digital version of Build a Blossom. I used the color picker to pick the color from the Ice Cream Parlor Strip 2 for the base of the card. The next layer is the square punch stretched and filled with Lap of Luxury Designer Series Paper Pattern 1. The upper petals of the iris are colored with Almost Amethyst and Lovely Lilac while the lower petals are Lovely Lilac and Concord Grape. The fluffy yellow part of an iris was created by shrinking the oval punch and filling it in with Daffodil Delight. I created the stem by stretching and narrowing the square punch and filling it with Always Artichoke. The leaves were created from oval punches and again filled with Always Artichoke. I added the Ice Cream Parlor Strip 2 and placed Ice Cream Parlor Strip 7 over it.

I love the way this card turned out. What do you think? Does it look like an iris? Leave me a comment and let me know.

Stamp Set Brushes: Build a Blossom (124019), Chat Room Friend (124543)

Paper: Lap of Luxury Designer Series Paper Pattern 1 (123992)

Punches: Scallop Oval, oval, and square from Punch Shapes (118853)

Accessories: Ice Cream Parlor Strip 2 and 7 from So Much to Sale-a-Brate Digital Content CD (123681) Free with $50 purchase! Offer ends March 31!

Thanks for coming by to visit today. Here is a virtual cup of coffee or tea for you to enjoy while you browse my site. Cup of coffee-001_edited-1


Happy stamping,
Sue Erickson
sue@soggystamper.com
Hurry, Only 4 days left of Sale-a-Bration!!!

IceCream Parlor-Bliss-001_edited-1 There are only 4 more days to take advantage of Sale-a-Bration where for every $50 order of SU product, you can choose a FREE item from the Sale-a-Bration brochure. I wanted to feature a couple of those FREE products in my card today. Yes, the product in this year's Sale-a-Bration brochure is available digitally on a FREE CD! How cool is that?

I used designs from the Ice Cream Parlor Designer Series Paper & Quick Accents Pack. I added the butterfly from the Bliss Stamp Brush Set and the 'thanks' greeting from the So Happy for You Stamp Brush Set. Add a Pear Pizzazz Seam Binding ribbon and bow and there you have it! So quick and easy and no mess or clean-up! Order your copy of My Digital Studio before March 31 and choose the Digital Content CD (123681) as your FREE gift.

Stamp Brush Sets: Bliss, So Happy for You

Background color: color picked from the designer series paper

Punches: Square resized, Top Note Shape filled with Ice Cream Parlor Pattern 5 – moved so floral design         at bottom of page shows in the punch

Other: Pear Pizzazz Seam Binding ribbon, Ice Cream Parlor Embellishments – Flowers

Thanks for coming by to visit today. I hope you took time to browse my blog as you enjoyed a virtual cup of coffee or tea with me.

Happy Spring Stamping,
Sue
sue@soggystamper.com