Category Archives: Special Occasion cards

MDS Monday – Winter Frost Digital New Year’s Card

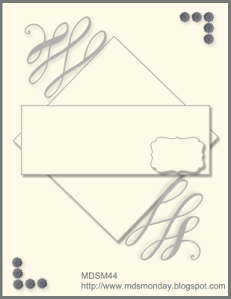
MDS Monday sketch 44

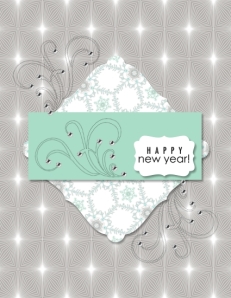
Here is a fun sketch for a card from the MDS Monday blog. Part of the challenge was to use flourishes. Once I added the flourishes to my card, they reminded me of fireworks. So I made the card into a Happy New Year card. Here is the result.

Winter Frost Designer Series Paper digital New Year card

I started with a base of Winter Frost Designer Series Paper pattern 11. Then I added the curvy square frame 2 punch from the Convention 2012 Photobook Template and filled it with pattern 12 of the Winter Frost dsp. The flourishes are Autumn Elements flourish 4 with the smallest basic rhinestones resized even smaller and placed on the tips of the flourishes. I think I will have to make this into a hybrid card to send out to some friends. All those rhinestones would really sparkle! Be fore-warned! This project has many, many layers and you have to be patient as your computer works on the project. Sorting through all the layers takes a lot of time!!!

If you need any of the downloads to make this project yourself, either click on the links below or visit my online store here.

Supplies:
MDS software digital download (130646), MDS software disc (130647), or 30-day Free Trial of MDS (130910)
Background
Winter Frost Designer Series Paper ( 135265) pattern 11
Embellishments
Basic Pearls and Rhinestones (124330) – rhinestone small
Stamps
Autumn Elements (127172) – flourish 4
When The Clock Strikes Twelve Ensemble (136679) – happy new year
Punches
Convention 2012 Photobook Template (130971) – curvy square frame 2 punch,  Filled with:  Winter Frost Designer Series Paper – 12
1.25 Square Punch (comes with program), Fill Color = Pool Party
Decorative Label Punch (123951), Fill Color = Whisper White

Looking for a child’s card? Check this one out!


Deco Label Pop 'N Cut

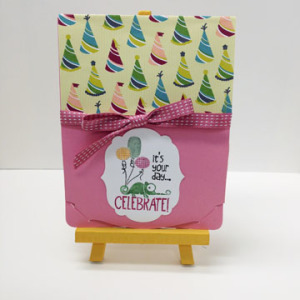
I created this card for my great-granddaughter who turned 5 in late November. I love this lizard with the balloons from the Tag It stamp set. I colored the stamp with markers to get the different colors on the stamp. I the card stock is one of the retired pinks, Regal Rose, and I used Birthday Basics Designer Series Paper.

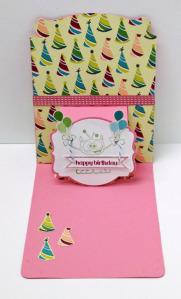
So, this is a cute card just looking at the card front, but wait until you see the inside!

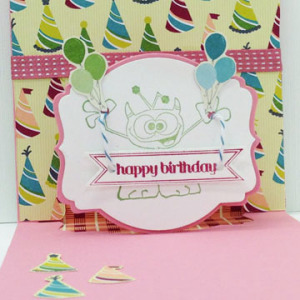
Monster Maniac Pop 'N CutYep! It is a Pop ‘n Cuts card using Stampin’ Up!’s exclusive Card Base Pop ‘n Cuts die and the Label Pop ‘n Cuts insert that coordinates with the Deco Label Framelits. Or maybe it is the other way around. The Deco Label Framelits coordinate with this insert. :op Here is a close-up of the label.

Monster Maniacs stamp set

I think the Monstermaniacs stamp set is perfect for kids’ cards. Although they are monsters, they are loveable. Hmmm…sort of like kids themselves? The greeting banner was stamped with Itty Bitty Banners stamp set and cut out with a Bitty Banners Framelits. I punched holes in the banner and used Island Indigo Baker’s Twine to hang it between the monster’s hands. I also fussy cut some balloons from the Birthday Basics dsp for the monster to hold.

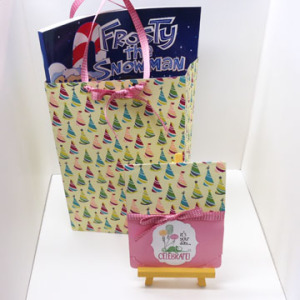
Finally, I needed a gift bag for the present and created it out of 1 1/2 sheets of the party hats pattern of the Birthday Basics Designer Series Paper. The bag measures 6″ wide x 9″ tall x 3″ deep. I love that the bag and card go match. You’d not likely find anything that matches so well at a Hallmark store!

Gift bag created using Birthday Basics dsp

To create these projects for yourself, order the supplies by clicking on the links below or visiting my online store and clicking on the ‘shop’ button. Email me if you want the directions for the gift bag. It is really quite simple to make.

Supplies:
Stamps – Itty Bitty Banners (126257-clear, 132022-wood), Tag It (130303-clear, 130300-wood) Monstermaniacs (134972 – only comes in clear mount)
Inks – Garden Green, Rose Red, Early Espresso, and Pumpkin Pie Stampin’ Write markers
Wild Wasabi ink pad
Paper – Regal Rose (retired) and Whisper White card stock,
Birthday Basics Designer Series Paper (130145)

Other – Deco Labels Collection Framelits (130102), Labels Collection Framelits (125598),
Bitty Banners Framelits (129267), Island Indigo Baker’s Twine (125575), Card Base Pop ‘n Cuts die (130099), Label Pop ‘n Cuts  insert (130160), Big Shot Die-Cutting Machine (113439)


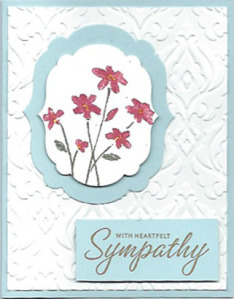
Close as a Memory Sympathy Card

Close as a Memory traditional sympathy cardSupplies:
Stamps – Close as a Memory (retired)
Inks – Rose Red and Always Artichoke Stampin’ Writers, Soft Suede stamp pad
Paper – Whisper White and Soft Sky card stock

Other – Labels Collection Framelits (125598), Beautifully Baroque Embossing Folder (130917)

My heart goes out to those who are going through this holiday season saddened by the loss of a dear family member. I have a good friend and customer whose husband just died this Sunday and needed to make her a sympathy card. I pulled out the retired stamp set, Close as a Memory for this card because I love the verse that is for the inside of a card.

Need a gift for a crafty friend or relative but don’t know what they already have? Here’s your solution! Order a gift certificate from me. You choose the value of the certificate and they get the fun of choosing what product or class they want. Email me if you want to buy one.

Have someone you wish would give you a gift certificate to spend on stamping supplies or classes with me? Email me their name and contact information and I’ll contact them for you. I also have a wish list program going. You fill out a list of about 6 things from the Stampin’ Up! catalog you would love to get for Christmas and write the names of the people you would like me to send your wish list to. Send the list back to me and I’ll contact those people for you. Contact me if you would like a wish list.

I know this is a very busy time of year but each of us needs to take a little time for ourselves. I have three classes here in Mount Vernon scheduled for December. Check them out and register now for one or all of them. Pre-registration and prepayment are required to reserve your seat. Spaces are limited so click here now!

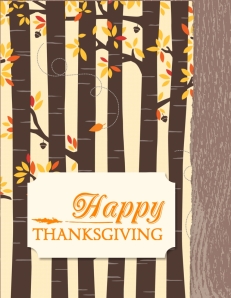
Happy Thanksgiving! – Wonderfall

Wonderfall DSP
Supplies: MDS software digital download (130646), MDS software disc (130647), or 30-day Free Trial of MDS (130910); Background – (131218) Wonderfall Kit,Wonderfall Designer Series Paper – 5; Stamp – (135910) Fall Memories November Kit, happy thanksgiving stamp in Pumpkin Pie color; Punch – (129924)Get It Done Kit – punch 1 filled with Very Vanilla; PhotosWonderfall Designer Series Paper – 5

Happy Thanksgiving! I am so grateful for all my readers and customers. May you be having a wonderful Thanksgiving with family and friends. For those of you who are missing loved ones, may your memories help carry you through the day.

I wanted to be able to tear the edge of the designer series paper so I added a photo box and stretched it to fit the size of the card. Then I dragged the Wonderfall Designer Series Paper design 5 into the photo box. By double clicking on the photo box, the option to tear the edges comes up in the list of options. Click on that then click on the side you want to tear. If you don’t like that shape, click on the side again which removes the tear. Then click again and you will get a different tear. Repeat this process until you find one you like. You can also adjust the width of the piece you tear off. I left mine at the default width.

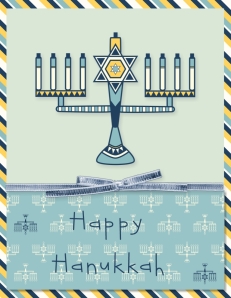
Hanukkah Happiness

Hanukkah Happiness

Happy Hanukkah to my Jewish friends and readers. May this season of Hanukkah be filled with joy, love, and peace for you and your family.

I created this card with MDS using the Hanukkah Happiness Ensemble. I love the colors of this ensemble and it is on sale through Nov 30! The MDS Seasonal Sale is in progress through Nov 30 with selected downloads and print products at 30% off. Now is the time to get your Christmas cards designed and gift items like calendars, journals, and recipe books created and sent off to Stampin’ Up!’s professional printer. Just think of all the gifts you can check off your list! But hurry and get them done. The deadline to place your orders at the sale prices is 11:50 pm on Saturday night.

Supplies:
MDS software digital download (130646), MDS software disc (130647), or 30-day Free Trial of MDS (130910)
Background
Hanukkah Happiness Ensemble (132715)- designer series paper/Hanukkah Happiness – 6
Embellishments
Hanukkah Happiness Ensemble – embellishments/Hanukkah Happiness – menorah
Silver Ribbon & Embellishments Pack (135267) – straight (re-colored) with Night of Navy
Silver Ribbon & Embellishments Pack – straight bow (re-colored) with Night of Navy
Stamps
Hebrew Holidays ( part of the Jewish Holiday Sayings Stamp Brush Sets download #128334) – happy hanukkah, Color = Night of Navy
Punches
1.25 Square Punch,  Filled with: Hanukkah Happiness Designer Series Paper– 4
1.25 Square Punch, Fill Color = 218,231,215

Terrific Tuesday – Endless Wishes

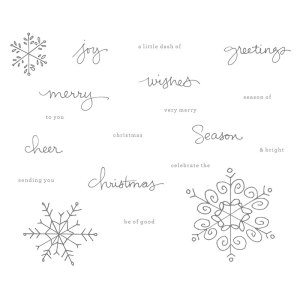
I love Tuesdays because we get new digital downloads for MDS. I was especially delighted to find a digital version of Endless Wishes, one of the new Photopolymer stamp sets. Just look at the delightful font and the beautiful snowflakes!

Endless Wishes digital index

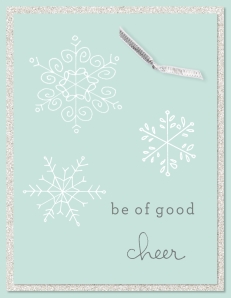
This is the card I quickly created with this set.

Endless WishesSupplies: MDS software digital download (130646), MDS software disc (130647), or 30-day Free Trial of MDS (130910), Endless Wishes stamp brush set 136559), Silver Ribbon and Embellishments Pack (135267), Glimmer Designer Series Paper (132917)

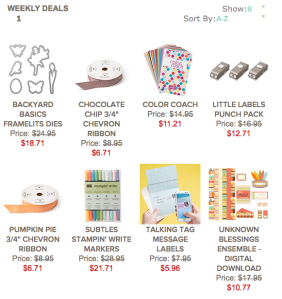
Another reason for Tuesdays being a terrific day is we get the new Weekly Deal from Stampin’ Up!. Check them out and then order your ‘must haves’ here!

Weekly Deals for 11-19-13

Now, if that isn’t enough, Stampin’ Up! just announced their annual Holiday Sale! There are four pages of items that are on sale from 20% to 50% off. To kick off the sale which runs from Nov 20 through Dec 1, there are three items which are 30% off for just tomorrow. Check out the wonderful savings here. Holiday_Sale_Flyer_US-1 You can place an order online, call me with your order, or email it to me.

It’s Terrific Tuesday for many Reasons!

I love interesting dates and today is a stellar one! 11-12-13! Whee, that was fun to type! That in itself makes this a Terrific Tuesday. On top of that, we get new digital downloads on Tuesdays! This week, not only do we get digital downloads but we also get three online classes using MDS digital downloads and techniques! Check out all that is offered this week and order your favorites here.

I have been thinking of ordering Santa’s List stamp set from the Holiday Catalog but have put off doing it because I am trying to cut back on my expenses this month. I was happy that it is now available in digital form and it is now in my library. Yay! I created this card with that download. I love Santa’s cheery face!

Santa's List stamp brush set


Supplies:

MDS software digital download (130646), MDS software disc (130647), or 30-day Free Trial of MDS (130910)

Background
Joyful Times Kit (130850) Joyful Times Designer Series Paper – 9

Embellishments
Timeless Taffeta Trimmings (131329) – knot soft suede (re-colored)

Stamps
Santa’s List (136515) – santa, colored with freeform brush and Cherry Cobbler co
Santa’s List – checking it twice, Basic Black color

Punches
Convention 2012 Photobook Template (130971)- curvy square frame 2 punch, Fill
color = Very Vanilla
Petite Curly Label Punch(stretched) from Punch Shapes (118853), Fill Color = Very Vanilla

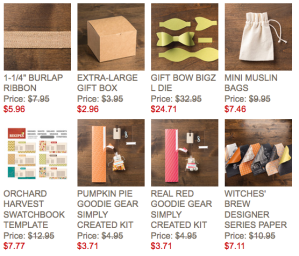
The third reason this is a terrific Tuesday is that the Weekly Deal is changed on Tuesdays. Check them out and order them quickly before the supply runs out!!!

Weekly Deals for 11-12-13

Joyful Christmas!

I’ve been really neglecting my traditional stamping for quite some time now. Settling into our house has been taking a lot of time. It’s hard to find new homes for all our ‘stuff’ and I mean ‘stuff’. Goodness, my tiny little stamp room in Craig was crammed with stuff. Here I have a much bigger room but less storage as it doesn’t have a nice closet to stash ‘stuff’ in. It is a challenger to find places to stash my stash. I may have to…oh horrors!…just throw away some of the stash that has been sitting around for YEARS!

Joyful Christmas

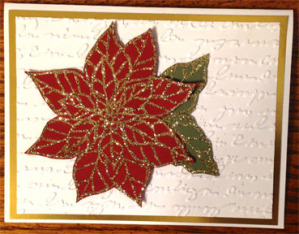
Anyway, I did create this card for my Craig stampers to make yesterday. I have been introducing them to heat & stick powder and glitter. This is the second month they have used those supplies. I’m just glad I don’t have to clean up all the extra glitter. :o) In case you are wondering, the print in the background doesn’t say anything. It isn’t even actual letters. The artist just wanted to simulate handwriting and I think they did a great job.

If you haven’t experimented with the Heat & Stick Powder yet, let me give you a few tips.

  • Don’t use a stamp whose image has a lot of detail. The detail gets lost in the glitter.
  • As usual, brush an Embossing Buddy over your card stock first. Then stamp your image with Versamark ink.
  • Then sprinkle Heat & Stick powder over the image like you would embossing powder. The Heat & Stick powder may be lumpy. It is OK to smash the lumps.
  • Use your heat tool to melt the powder just until it becomes shiny. Overheating will drive the powder into the card stock and it will lose its stickiness.
  • Sprinkle your glitter on, tap off the excess, and then heat the image again for about 5 sec. This will help set the glitter.

I encourage you to give this product a try. You will be able to have glitter on precisely the lines of your image. Click on the linked products below to order the supplies for this project or visit my online store to order them.

Supplies:

Stamp set: Joyful Christmas (131805-c, 131802-w)
Ink: Versamark (102283)
Card Stock: Whisper White (100730), Cherry Cobbler (119685), Always Artichoke (105119), Gold Foil Sheet (132622)
Other: Pretty Print Textured Impressions Embossing Folder (132175), Gold Stampin’ Glitter (132205), Big Shot Die-Cutting Machine (113439)

Happy Spooky Halloween!

Spooky Halloween-001

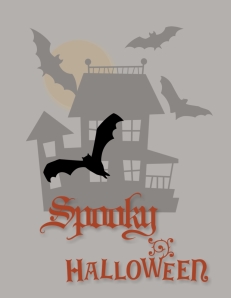
Happy Halloween to you! Don’t let the goblins get you today! The day I created this digital Halloween card, it was really foggy and I thought of how spooky an old deserted house would look on a foggy night.

So how did I get the foggy look? First I added the house from Spooky Bingo Bits to a Smoky Slate background and enlarged it some. Then I added a circle punch and filled it with More Mustard. I added a drop shadow of Crushed Curry with 100% opacity and full blur and off set it quite a bit. I added the Spooky Bats which are in the Wicked Fun Kit and the greeting stamps.

To get the foggy look, I added a square punch enlarged to 4.25″ x 5.5″ and aligned it over the card. I filled it with Smoky Slate color and decreased the opacity to about 75%. I used the layers tool to move this layer back behind the greeting and the foremost bat. I love that layer tool!

So what do you think? Did I achieve the foggy look? Let me know in a comment below. If you want to create this card for yourself and need some of the supplies, click on the links below or visit my online store.

Supplies:

MDS software digital download (130646), MDS software disc (130647), or 30-day Free Trial of MDS (130910)

Background
Card Stock/Smoky Slate
Stamps
Spooky Bingo Bits (127616) – haunted house
Wicked Fun Kit (127609) Spooky Bats stamp set – bat 1, 2, 3, 4/Wicked Cool stamp
set – spooky, Color = CAJUN CRAZE
Spook Central Designer Ensemble (127589) – stamps – halloween, Color = CAJUN
CRAZE
Punches
Basics/1.25 Circle Punch, Fill Color = MORE MUSTARD
Basics/1.25 Square Punch, Fill Color = SMOKY SLATE

Have a Wonderfall Thanksgiving Canadians!

Wonderfall Kit

Happy Thanksgiving to all my Canadian readers and friends. I hope you are having a wonderful holiday weekend with family and friends.

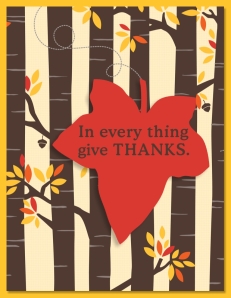
I created this card using the Wonderfall Designer Series Paper from the Wonderfall Kit. The pattern on the paper is scaled to a 12 x 12 page which showed little of the trees when applied to my card. I reduced the size of the design by filling a 4″ x 5.25″ rectangle with pattern 5. Then I double clicked on the rectangle and used the minus magnifying glass to reduce the scale of the design. I love this feature of MDS where the scale of a pattern can be reduced to fit your design needs. If you haven’t tried this yourself, I encourage you to do so. Contact me if you need help with this feature.

Supplies:

MDS software digital download (130646), MDS software disc (130647), or 30-day Free Trial of MDS (130910)

Background
Card Stock/Crushed Curry

Stamps
Grateful Heart Thanksgiving Ensemble (127620) – leaf 2, Color = POPPY PARADE
Bright Blessings Stamp Brush Set (127404)- give thanks, Color = EARLY ESPRESSO

Punches
Basics/1.25 Square Punch (comes with program),  Filled with: Wonderfall Designer  Series Paper – 5 from Wonderfall Kit (131218)

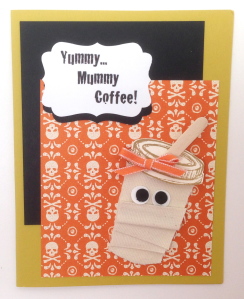
Yummy…Mummy Coffee – Perfect Blend


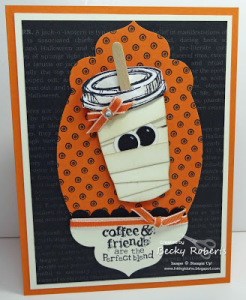
A couple of weeks ago, Becky Roberts shared this cardPerfect Blend

I told her I was going to CASE it. However, I am not very good at CASEing because I usually change something. So here is the card I created based on Becky’s card.Perfect BlendI was too lazy to go outside and get out my Big Shot and dies. I used the Natural 7/8″ Cotton Ribbon because I think it looks a lot like what mummy wrappings. The greeting is computer generated and punched out with the Decorative Label punch. Wonder how I got the black borders to it? I punched a second one out of Basic Black card stock, cut it in half and stuck the pieces to the back of the greeting.

This Perfect Blend stamp set is the first one I ordered from the new catalog. What was your first stamp set? Leave a comment.

Supplies:

Stamps – Perfect Blend (131392-c, 130745-w)
Paper – Basic Black, Summer Starfruit, and Whisper White card stock; Witch’s Brew Designer Series Paper (132185)
Ink – Early Espresso
Other – Decorative Label Punch (120907), Natural 7/8″ Cotton Ribbon (127844)

Tags 4 You

Tags 4 You Thanksgiving card

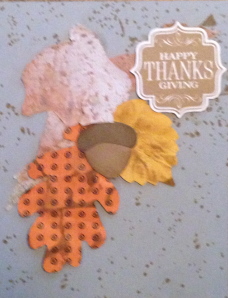
Way back in July I shared a couple versions of a Christmas card using the Tags 4 You and Winter Frost Specialty Designer Series Paper. You can see that post here. Today I have a Thanksgiving card using the Thanksgiving stamp from that set. I discovered a wonderful birch tree when we were at Northwest Hospital that was shedding its bark and I took a large piece of it. I love using it on this card. I adhered it with 2-Way glue. Want to know a leetle secret? I ended up with glue spots under and around the tag. I used the splatter stamp from Glorious Grunge to cover them up.

This set is quite versatile and even comes in a bundle with the Label Bracket Punch. Check out the index and then order one here.

Tags 4 You

Supplies:

Stamps – Tags 4 You (131823-c, 131820-w), (133294-clear bundle, 133293-wood bundle); Gorgeous Grunge (130517-c, 130514-w)

Ink – Baked Brown Sugar

Paper – Whisper White, Smokey Slate, Crushed Curry, Baked Brown Sugar, and Chocolate Chip card stock; Witch’s Brew Designer Series Paper (132185)

Other – Label Bracket Punch (132153), Autumn Accents Bigz Die (127812), Big Shot Die-Cutting Machine (113439), 2-Way Glue Pen (100425)

Best of Halloween with Halloween Washi Tape

Best of Halloween

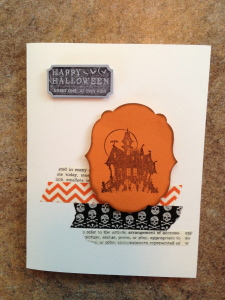
I have not liked using staples on my cards nor using Washi Tape because I am somewhat of a perfectionist and staples and Washi Tape suggest to me that the card was just carelessly slapped together. However, I am slowly coming around to the current trends. This card is my first time using Washi Tape and I like the effect that the Witch’s Brew Designer Washi Tape gives. The Halloween stamp of the That’s the Ticket makes a perfect greeting! So what is your feeling about Washi Tape? Post it in a comment below.

Supplies:

Stamps – That’s the Ticket (131946-w, 128075-c), Best of Halloween (134381)

Inks – Basic Black and Early Espresso

Card Stock – Very Vanilla, Smokey Slate, Pumpkin Pie

Other – Ticket Duo Builder punch (126883), Labels Collection Framelits (125598), Big Shot Die-Cutting Machine ( 113439), Witch’s Brew Designer Washi Tape (132156)

To order any supplies you need to make this card either visit my online store or click on the product names to go to my store.

Best of Halloween

Best of Halloween stamp set

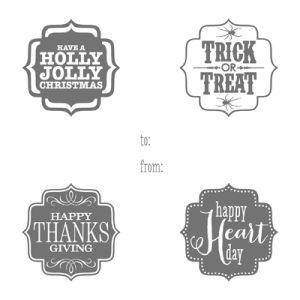
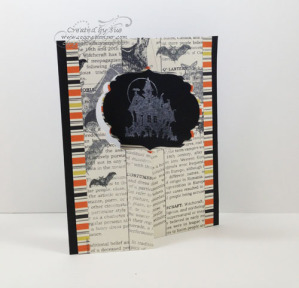
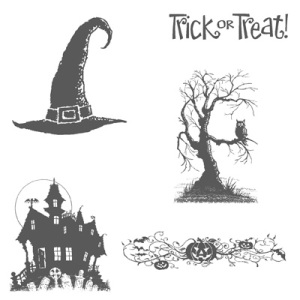
Remember this Halloween flip card I made a couple of days ago using the Label Card Thinlits Die? If you missed it, here is the post with the details of the card. The stamps came from the August Best of 25 Years stamp set, Best of Halloween. Today I am featuring that stamp set. Here is a photo of the stamps included in the set:

Best of Halloween stamp set

Here is another card I made with the set.

Best of Halloween #2

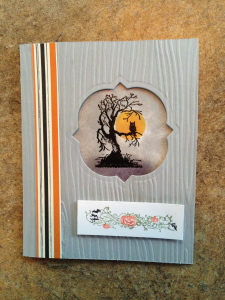
I wanted to create the illusion that you were looking out a window at that owl in the tree so I used a Window Frame Framelit to cut out the front of the card. I had first embossed the card front with the Woodgrain embossing folder and then remembered that he embossing would get flattened a bit when I used the framelit. Oh well…the end result is still pretty good. I stamped the image on Whisper White card stock with Versamark ink and embossed it with black embossing powder. Then I punched out a circle and used the negative piece to sponge the moon with Crushed Curry and Crisp Cantaloupe ink. I used the circle to mask the moon and sponged Smokey Slate and Basic Black ink around the image. I trimmed the Whisper White piece down to a square that fit behind the window and  mounted it behind the window with Stampin’ Dimensionals. I glued a piece of the striped Witch’s Brew Designer Series Paper trimmed to 5 1/2″ x about 2 1/2″ on the inside of the card front to cover the Whisper White square. I also added a narrow strip of the designer series paper on the front of the card. I used Wild Wasabi, Tangerine Tango, and Basic Black markers to color the image on the bottom. I absolutely love the way this card came together! Visit my FaceBook page to see another card made with this stamp set and come back here tomorrow for still another idea.

Supplies:

Stamps – Best of Halloween (134381)

Inks – Versamark, Crisp Cantaloupe, Crushed Curry, Smokey Slate, Basic Black

Paper – Smokey Slate (131202) and Whisper White (100730) card stock, Witch’s Brew Designer Series Paper (132185)

Other – Woodgrain Textured Impressions Embossing Folder (127821), Big Shot Die-Cutting Machine (113439), Window Frames Collection Framelits (129021), Black Stampin’ Emboss Powder (109133), Heat Tool (129053)

To order any of these supplies, visit my online store or click on the linked names of the products.

Gingham Garden Happy Birthday

Gingham Garden Digital DSP

This week’s digital downloads for MDS are all so great that I had a hard time choosing which to order. Did you see them? Check them out here. I was delighted that the Gingham Garden Designer Series Paper is now available in digital form for us digi girls. The great thing about digital dsp is that you will have an unlimited supply of your favorite designs. And how about the wonderful About to Bloom August Kit that coordinates with the FREE August wallpaper. There are so many gorgeous flowers in that kit!

This card was quickly created with the Gingham Garden Designer Series Paper pattern 10, the 1.25 square punch stretched to 4.805 inches wide and 3.598 inches high, and the Birthday Candles stamp brush set which is also a new download this week. The greeting is from the Little Milestone Birthdays Greeting Cards Template Set. I used the coloring tool on the birthday candles to color the flames a different color than the candles.

Supplies:

MDS software digital download (130646), MDS software disc (130647), or 30-day Free Trial of MDS (130910)

Stamps – Birthday Candles (134921), Little Milestones Birthdays Greeting Cards Template Set (129890)

Paper – Gingham Garden Designer Series Paper (134853)

Hurry, it’s the last day!

Buy 3 get 1 free

Today is the last day of this special. Buy three packages of designer series papers and get a fourth one free. Choose 4 different designs or stock up on your favorite one. The designer series paper packs and specialty papers are not included in this promotion. Click on the image to go to my online store and choose your favorites. This is a rare offer so order now!

Today is also the last day to order the darling single stamps. Check them out here.